Open your heart

A non-modified fish poseIn honour of Valentine’s Day, I’m teaching a heart-opening sequence in my 8:15pm Yin Yoga class at Bound Lotus ♥. The flow I’ve put together starts off with supported fish pose. The traditional version of fish (known as Matsyasana in Sanskrit) is an amazing chest opener and the modified version of the posture is more decadent and restorative, but still impactful.

Fish is all about reaching your chest up, while relaxing your lower body. Detailed instructions for getting into supported fish (and getting out!) follow.

If legs up the wall is the one pose I think everyone should do after a lower body workout (running, cycling, hiking, walking in heels), then fish is certainly the one pose I’d suggest for releasing any emotional issues (my friend and fellow teacher Nadine likely agrees šŸ™‚ ). Holding fish pose (and supported fish) can dispel all kinds of long-held chest-tension, which sometimes leads to a huge emotional release (read: it’s totally okay to cry while/after doing fish).

Happy Valentine’s Day!

Supported fish pose

Why it’s good

  • Increases lung capacity, which makes it great for asthmatics and athletes, and flushes mucus from the lungs
  • Corrects the tendency to round shoulders, which collapses the energy centre at the heart (anahata chakra), and breaks up tension in the mid- and upper-back
  • Strengthens and gently tones the muscles along your spine
  • Stretches abdominal muscles and creates internal space for internal organs
  • Lots of emotional and energetic benefits
    • Activates the throat energy centre (vishudda chakra), which is related to the way you express yourself
    • Releases grief and helps dispel old emotions by opening the heart energy centre (anahata chakra)

How to do it

  • Sit on your mat with knees bent, feet on the floor; snug the short end of a bolster against your lower back/buttocks – you can also use a firm pillow or rolled blanket if you don’t have a bolster
    • Using a bolster eases pressure and demand on your back muscles; the closer you place the bolster to your buttocks, the greater the stretch
  • Use your arms and hands to slowly lower your back, neck, and head onto the bolster
    • If your head doesn’t rest rest on the bolster, pillow, or rolled blanket, bring in another prop to support it
    • If the stretch is too intense in your lower back, place a foam chip block, pillow, or folded blanket under your buttocks
  • Straighten your legs along the mat; bring your heels together and let your big toes relax to the sides, forming the shape of a fishtail with your feet
  • Rest your arms on the floor, at least 45Ā° away from your body, and turn your palms up
  • Tuck your chin into your chest slightly; relax your jaw, throat, and shoulders; disengage the muscles in your abdomen, hips, and legs
  • Settle into the pose; inhaling deeply into your chest and relaxing your shoulders, hips, and legs with each exhale
  • Remain still for up to 10 minutes, breathing smoothly and feeling your chest expand and contract with each breath

To come out of supported fish:

  • Bend your knees and rest your feet flat on the floor
  • Roll to side off the bolster into fetal pose; take a deep breath in fetal pose before removing the bolster and any other props used
  • Release any tension in your back by holding your knees into your chest and rolling on your back
  • It’s nice to link fish to a forward fold (like butterfly or caterpillar) or a reclining twist to counter the backward bend


Breathing fire

January 23 marked the start of the lunar new year (aka Chinese New Year) and 2012 is the Year of the Dragon. I welcomed the new year with a series of dragon poses at myĀ 1pm yin yoga class on Monday. It was a hip-intensive class that really breathed some fire into the new year!

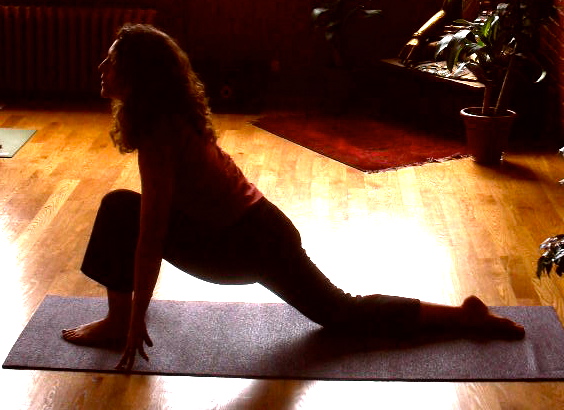
Dragon pose is a long-held lunge that’s great at opening hips. It can be quite intense and sometimes stirs up some anger or irritation, but the immediate loosening through the hip flexors, quads, and glutes makes it worthwhile. I feel like I have wonderfully mobile “salsa hips” after a good dragon series, which makes the rage I feel settling into the pose worthwhile and keeps me doing dragons.

I’ve included detailed step-by-step instructions for high-flying dragon below; take a look at the Yin Yoga page on dragons for alternative variations.

High-flying dragon pose

Why itā€™s good

  • Provides a deep hip and groin opener
    • Gets into the connective tissue in the hips and helps work deeply into hip socket
  • Stretches hip flexors and quadriceps
    • Some variants also stretch the glutes, calves, Achilles, and feet
  • Builds strength through the legs and core
  • Improves balance
  • Releases tension (and anger!) from the hips

How to do it

  • Warm up your hips first with some gentler hip openers (like butterfly or half sleeping baby), then move into all fours or down dog
  • Step your right foot between your palms and rest your left knee on the mat
    • Add a foam chip block or folded blankets under your left knee to cushion the joint
  • Relax your pelvis towards the mat until you feel a stretch at the front of your left thigh and groin
    • Keep your right foot in-line with your right knee and hip and your left foot in-line with your left knee and hip
    • Square your hips toward the front of your mat
  • Lift your torso upright and rest your hands on your right knee for balance
    • If you’re feeling well-balanced, bring your hands behind your back and interlock your fingers in yoga mudra
      • If your hands are in yoga mudra, focus on letting them come towards the floor, relaxing your shoulders, and opening your chest
  • Feel your spine lengthen as you inhale and relax your pelvis down as you exhale
    • Let your breath out forcefully (as if you were breathing fire) to release anger and really embody a dragon – also just because it’s fun šŸ˜‰
  • Settle into the pose and remain still for one to five minutes
    • Keep your breathing even and unforced
    • Relax your shoulders
    • Find a drishti (or focal point) to still your gaze and help settle your mind
    • Don’t fidget, but adjust your position if your body invites you to deepen the posture or if the pose feels painful or too intense
  • Follow the guidance for coming out of dragon below and then repeat – stepping your left food between your palms

To come out ofĀ dragon:

  • Roll back onto your left heel, stretching your right leg straight in front of you
  • Pull your right toes back and hold them with your right hand if possible
    • Feel the stretch through your right calf and the back of your thigh
  • Release your right toes and come to all fours
  • Push back into each hip, drawing a horseshoe shape with your hips
    • Hopefully the loosening in your left hip (and possibly your right, too!) provides seriousĀ motivationĀ for coming into dragon on the other side!

After holding dragon on each side for a few minutes, coming into aĀ recuperativeĀ position like child’s pose can be particularly nice. Child’s pose is also good because it also gets into the hips and can help you feel the impact of your dragons.

If you do only one yoga pose…

Legs up the doorIf you only ever do one yoga pose, make it legs up the wall. It’s one of the easiest postures and is the foundation for many restorative yoga practices. It’s fabulous after a hike, run, long-walk, cycle, or anything that works your legs.

All it takes is nestling your bum next to a wall and swinging your legs up; once your legs are up the wall, relax and let your back body sink into the floor. That’s it!

It was immeasurably helpful for me after an accidental 8-hour hike in China this fall – luckily the hostel bed was tucked right against the wall so my back was well-cushioned!

I’ve included step-by-step instructions below.

Legs up the wall pose

Why it’s good

  • Encourages healing throughout the body by stimulating the parasympathetic nervous system
  • Slows the stress-induced sympathetic nervous system – our fight or flight reflex
  • Activates the body’s relaxation response; lowering the resting heart rate, slowing breathing, and decreasing the production of stress hormones
  • Brings fresh blood and lymph fluid into the abdomen and internal organs
  • Relieves tension in the lower back and sacrum
  • Reduces swelling, tension, and stress in feet and legs
  • Raises the feet above the heart; reversing effects of gravity, improving heart function, and allowing the heart to rest

How to do it

  • Sit on the floor with the side of your hip against a wall or a closed door
  • Swing your legs up the wall, pressing your bum into the corner where the floor and the wall meet
  • Lower your back to the floor and lean your heels against the wall
    • If keeping your legs straight is too much for your hamstrings, slide your bum away from the wall and bend your knees slightly
    • Your spine should be perpendicular to the wall with your back on the floor
  • Rest your arms alongside your body, lengthen them out in a “T” shape, or extend them over your head for more of a chest and back stretch
  • Let go of the tension in your legs and pelvis
    • Make it even easier by Ā strapping your ankles together (try a bathrobe belt or an elastic exercise band if you don’t have a yoga strap) so you don’t have to work to keep your legs close together
    • Add a folded blanket under your hips or head if you need more padding to be comfortable
  • Breathe into your belly and relax everything
  • Hang out in this posture for 5-20 minutes – try to relax for at least five minutes

To come out of legs up the wall:

  • Bend your knees and slide the soles of your feet along the wall towards your bum
  • Remove anything you’re using to hold your legs together and press your lower back into the floor for a couple breaths
  • Squeeze your knees into your chest and roll from side to side on your back to release any tension in your lower back
  • Roll to one side and slowly come up to a seated position
  • Breathe deeply for at least three breaths to allow the blood to settle back into your body and prevent getting a head rush when you stand up